Utah with the Nikon Z7

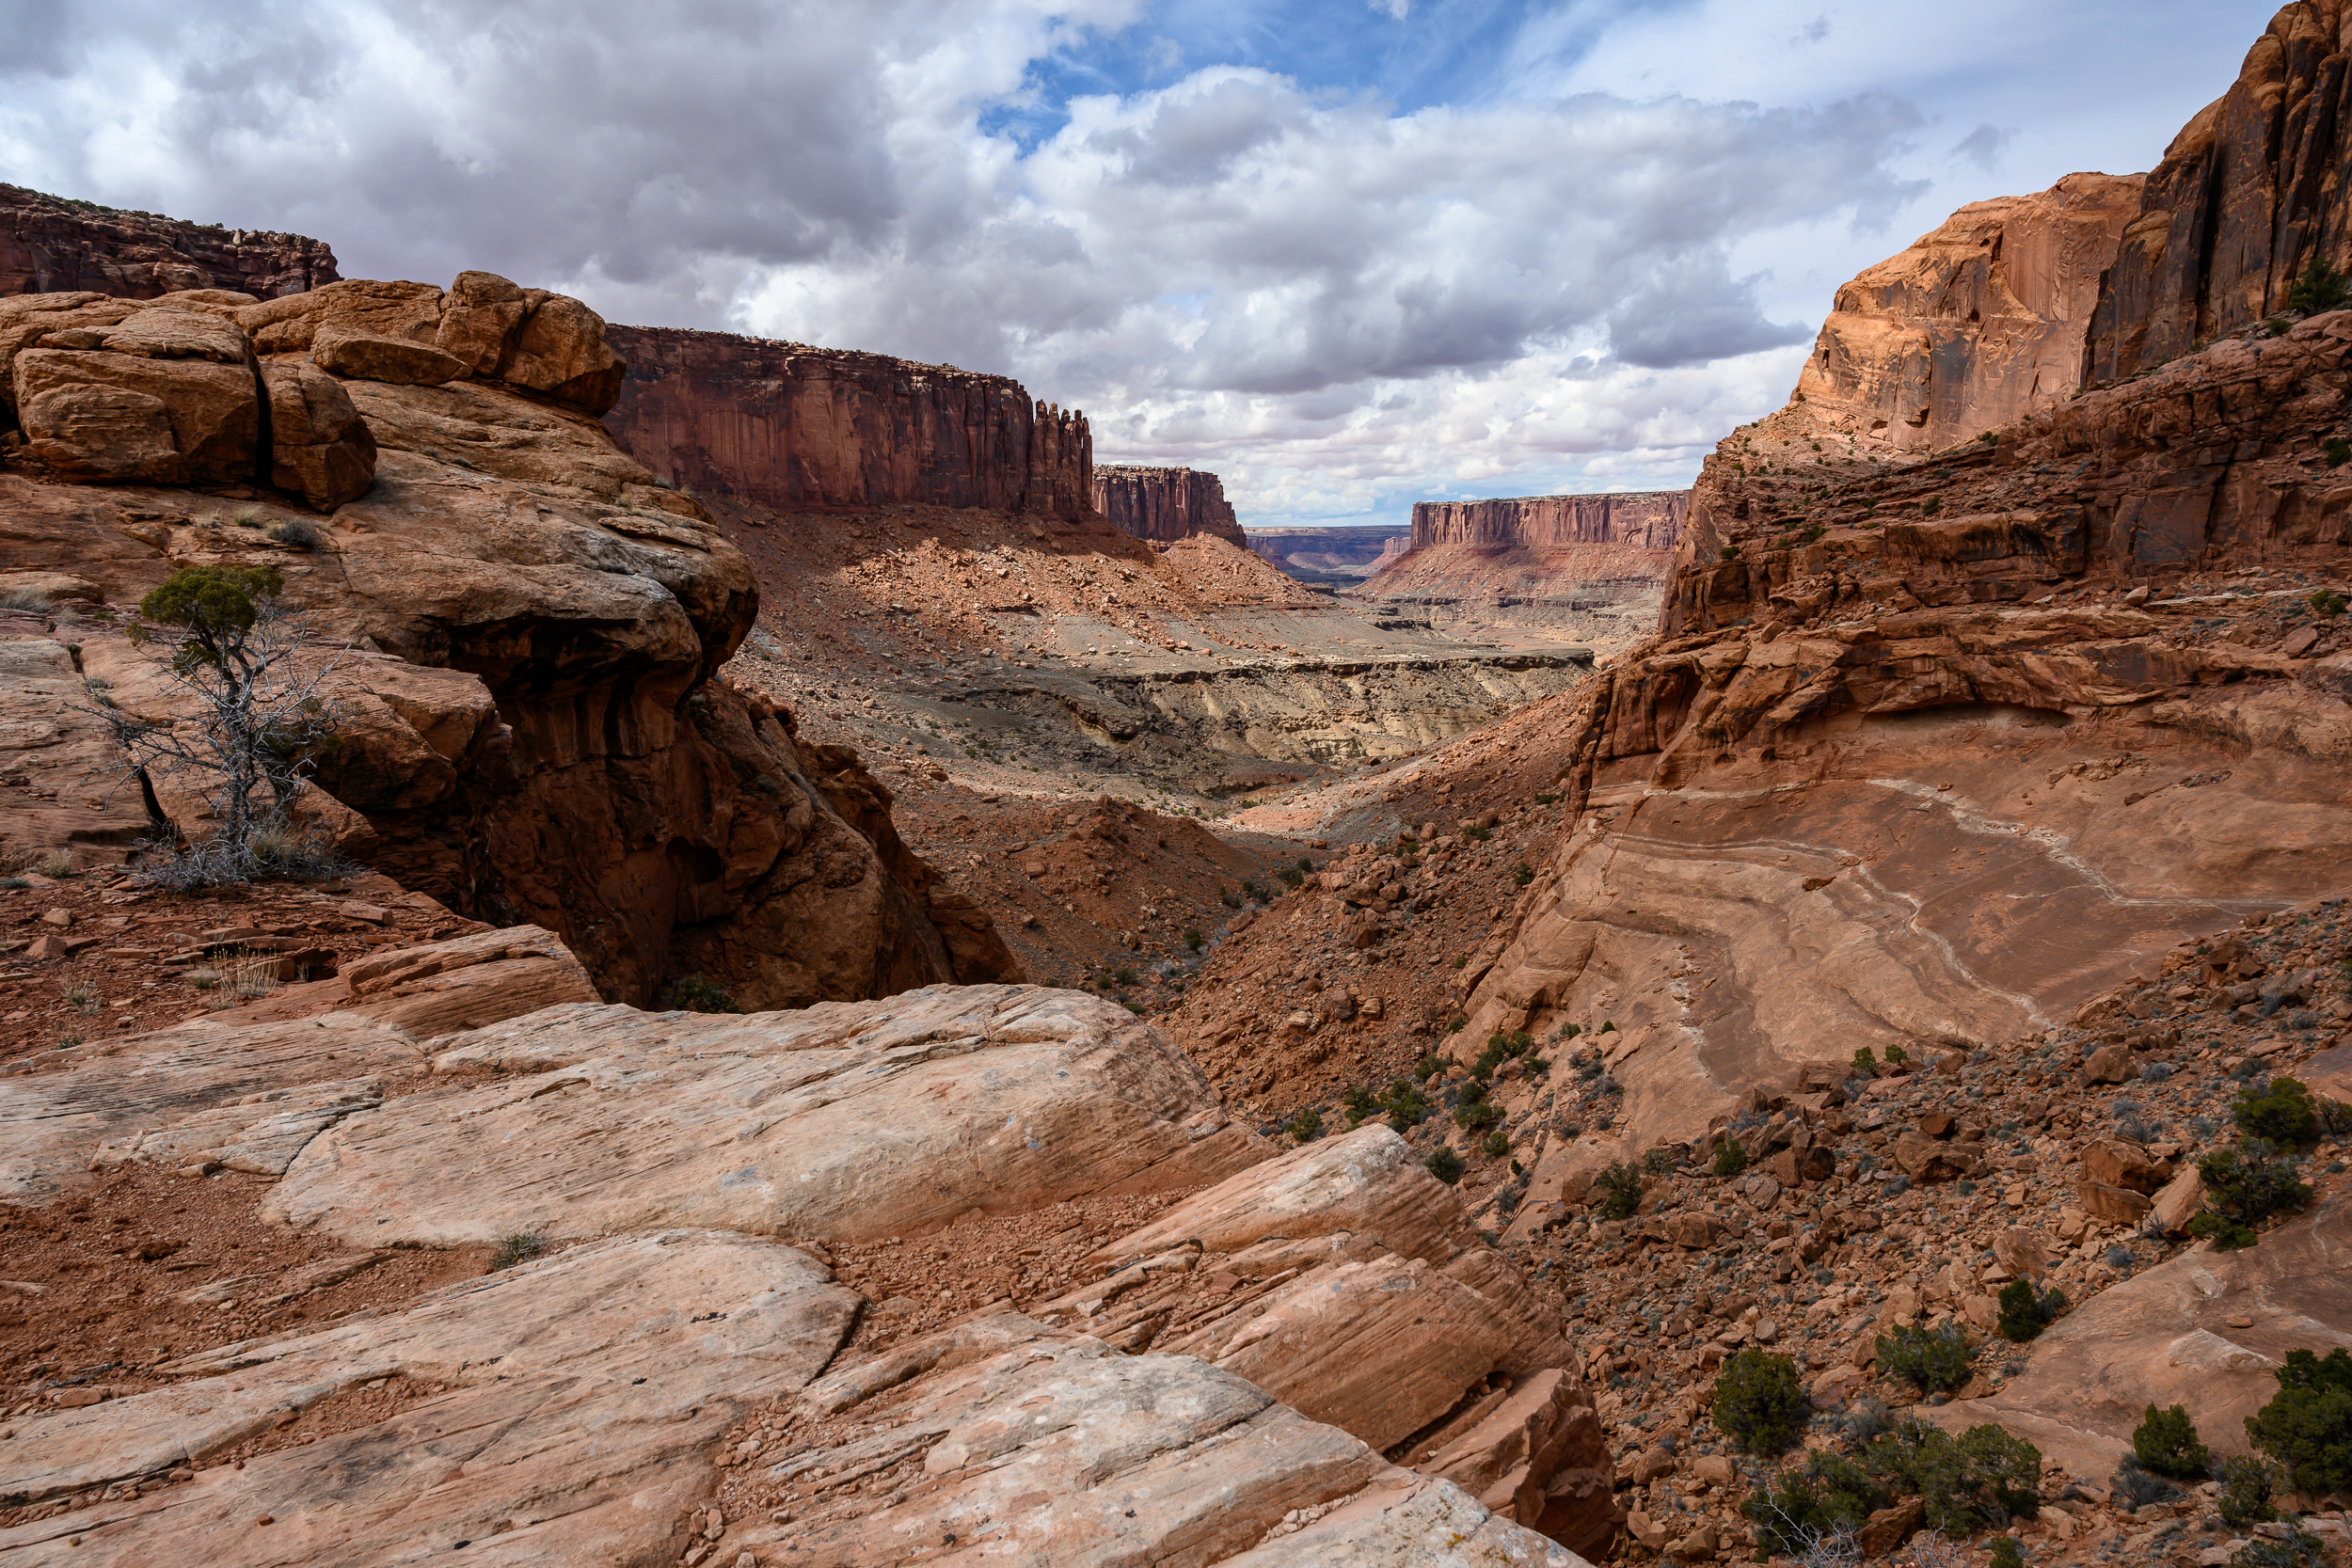
We blast over the divide and into Utah for a long weekend and find a truly stunning camping spot overlooking a canyon just outside of Canyonlands National Park. We might end up just sitting here the whole weekend.

Moab-0402.jpg
Moab-0385.jpg

I was able to score a Nikon Z7 w/ Nikkor Z 24-70mm zoom lens to test for the weekend. All photos from this post are taken with that camera, and more detailed review follows (warning, I’m not a gear junkie, it’s more of an aesthetic review than a technical).

We do end up leaving the camp to do the Syncline Trail in Canyonlands NP. This trail is awesome. It circles the Upheaval Dome, the origin of which is unknown (cool). First we hike down into a canyon and along a riverbed, then up a boulder field and back to the start. It’s certainly my kind of hike: the trail isn’t always obvious, scrambling required, lots of up and down through amazing scenery and very few people.

Moab-0127.jpg
Moab-0137.jpg

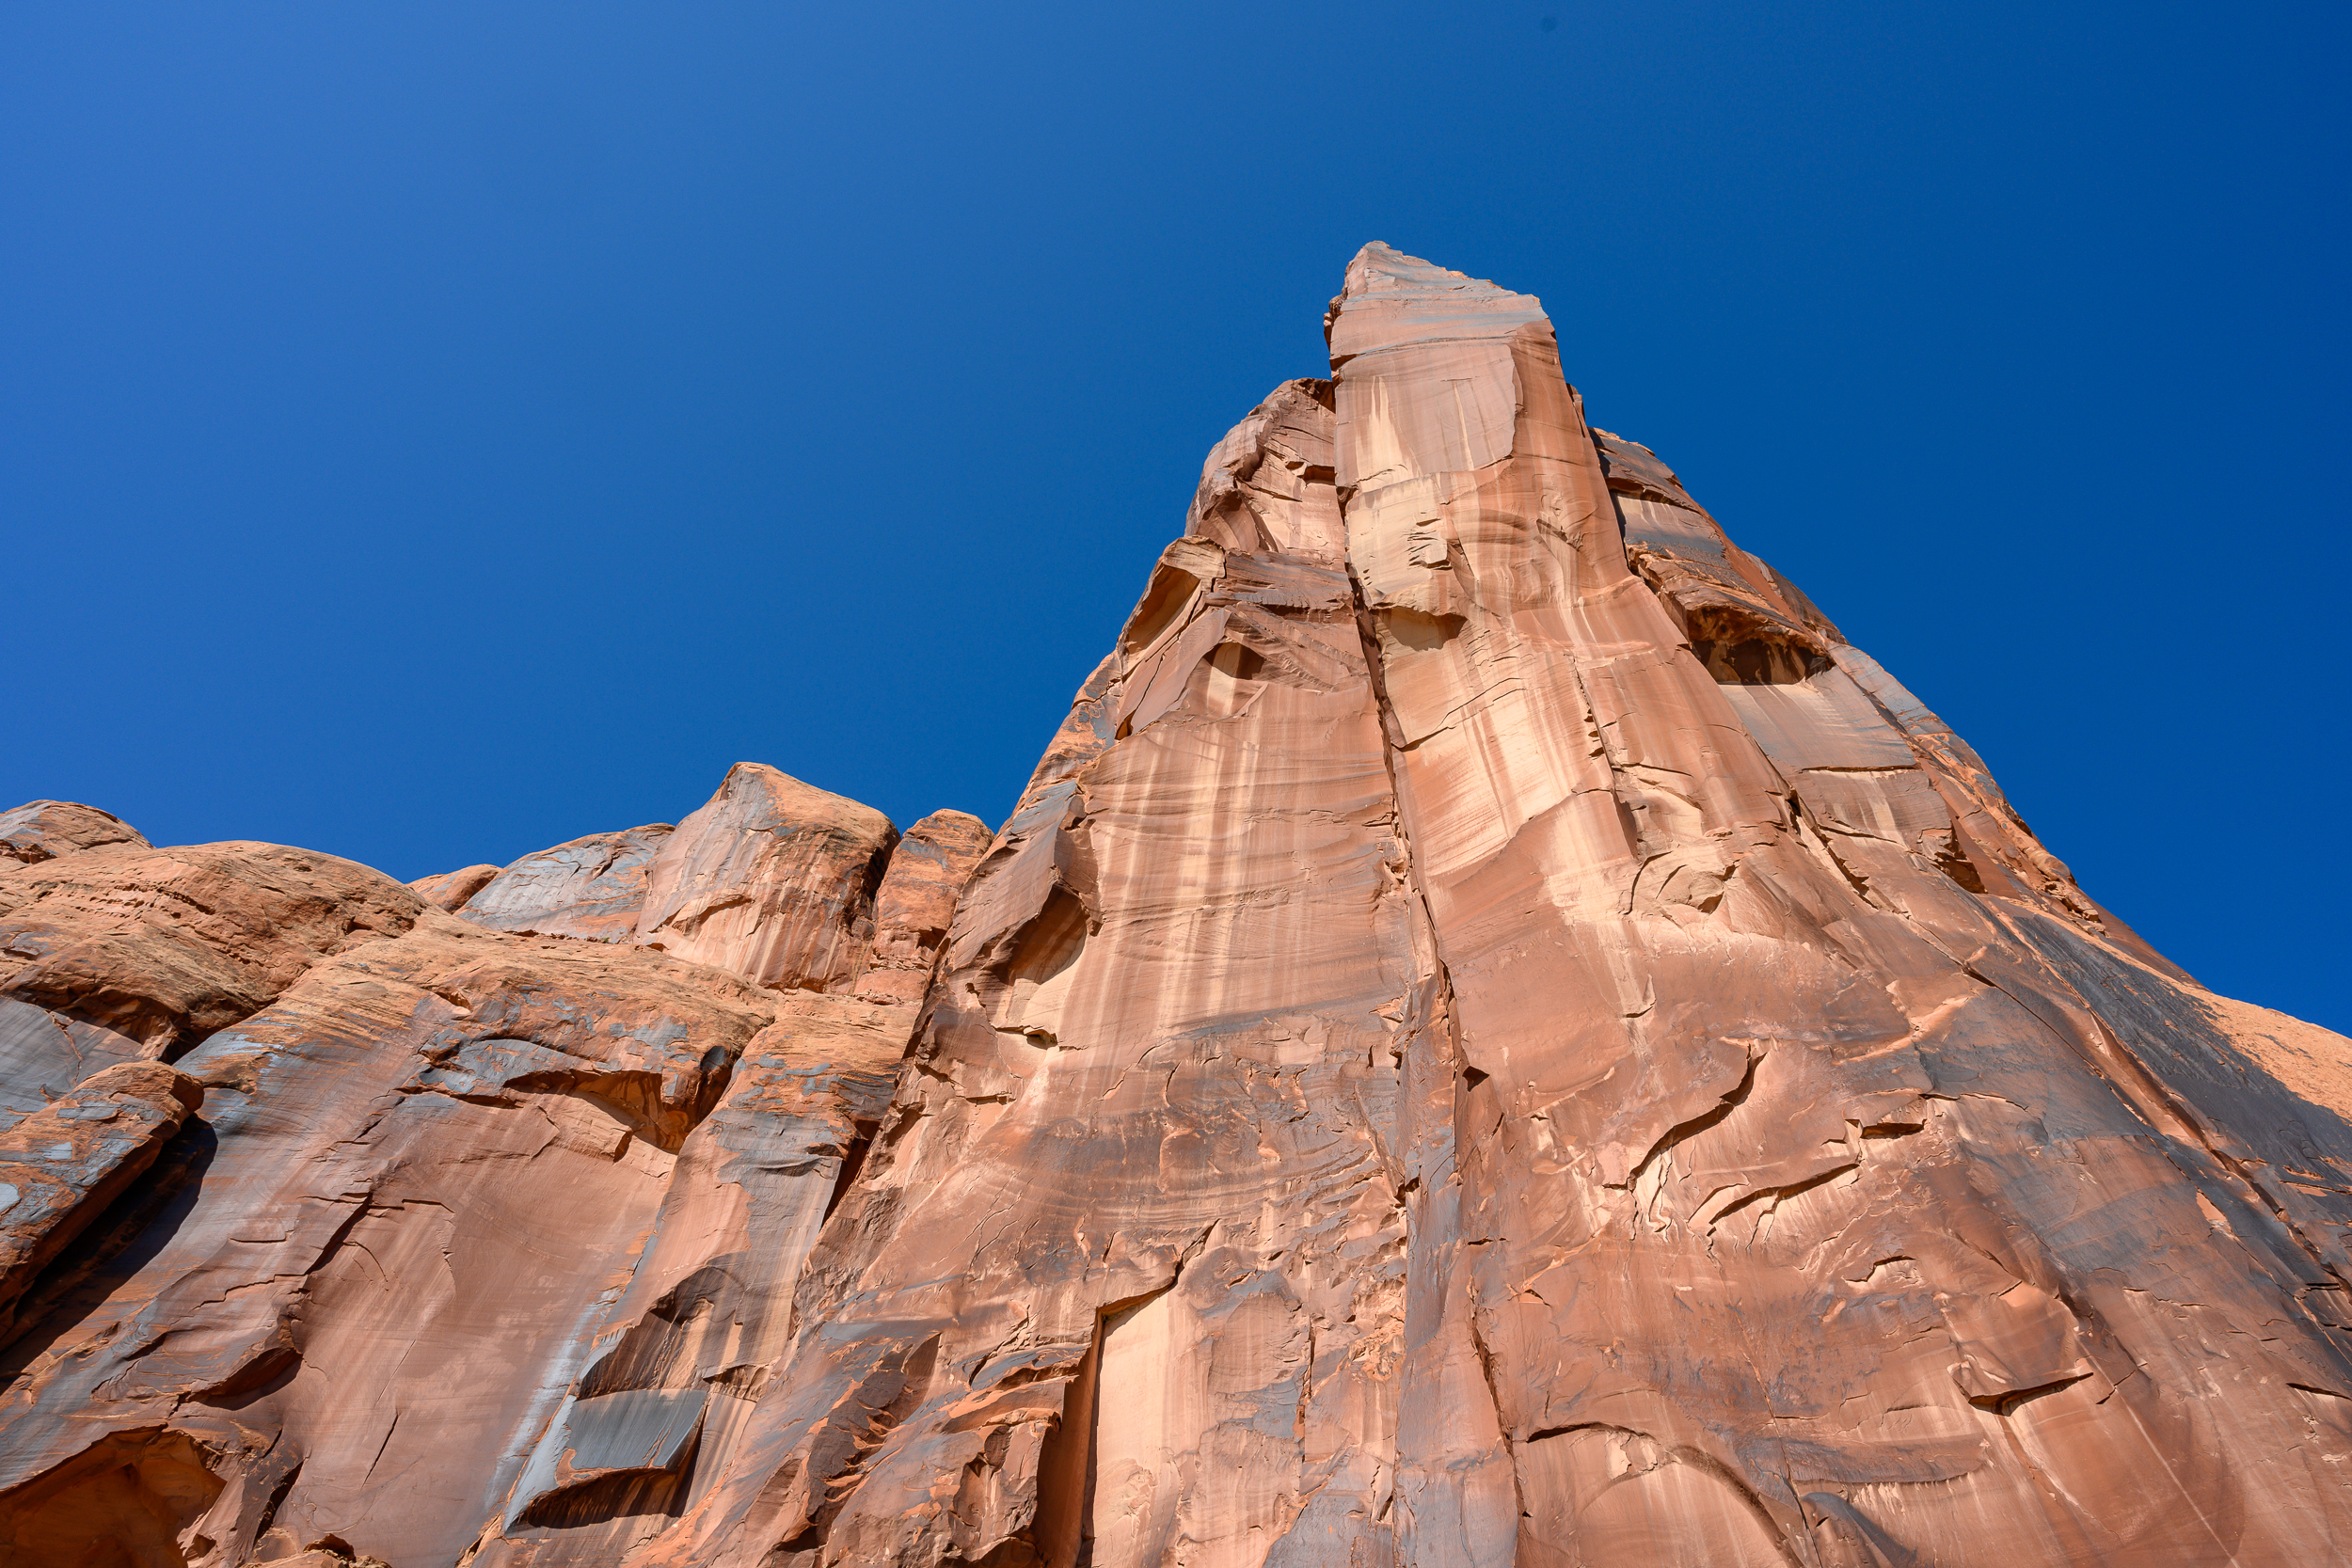
The Devil’s Garden & Primitive Trail in Arches NP also has the scenery but is much more popular. The Devil’s Garden Trail is very busy, makes sense there are a ton of arches in a short span. For being a popular trail in a National Park I’m pleasantly surprised by the ruggedness of some sections, especially the ones walking on and over rock faces. Taking the Primitive Trail makes this hike a loop (yay!) and adds more of a challenge with steep rock climbs and less obvious trail. Despite the warnings of such our hike on this trail turns into more of a rescue mission. K pulls an 80 year old woman up a rock face (kudos to her for making it that far!), I guide a group of hikers down a steep section of rocks and we help a number of people re-find the trail. It’s kinda fun, makes me feel like I know what I’m doing.

Moab-0219.jpg
Moab-0326.jpg

One of the days we switch it up with a bit of 4WDing down the valley we are camped by and under a giant rock. We also explore Moab a bit - I found a $4 flannel shirt in a thrift shop, that’s my highlight from town.

Moab-0283.jpg

On the way back to Boulder we stop to do the Professor Creek and Mary Jane Trail. The trail follows a creek up a deeper and deeper canyon and ends with a waterfall (we didn’t go that far, just to the canyon). It’s really fun to splash through the creek. There isn’t really a trail and we end up follow footprints in the sand to make sure we are going the correct way. It would be easy to get lost in these canyons and if it was raining a flash flood would be dangerous here. Getting back is easier, just follow the main branch of the creek back the way you came.

Using the Nikon Z7 for the weekend was a fun treat (my primary cameras for hiking & backpacking are the Sony A6000 or Sony A7R ii). I don’t often use zoom lenses so I had to retrain myself how to take photos. I don’t have to walk around to get different shots, I can zoom! As fun as the zoom is I really enjoy using prime lenses, I feel like they are more “natural” to how my eyes perceive the world. Due to habit most of the pictures in the post are taken at 24mm, the widest the lens goes, because I forgot the lens could zoom. The exceptions are the shot with the car which is at 38mm and the shot of the arch which is at 36mm.

The camera has a nice feel in the hand, the grip is more robust than the Sony’s, and has a nice look to it. I’m not fully dialed in with the Nikon control menus but I found it easy to navigate and use when I wanted to change settings. For the kit lens I found the Nikkor 24-70mm to take excellent pictures. The biggest con for me is the weight (why I love the Sonys so much), I think the Z7 would be good on day hikes but it would be too much for a longer trip.

If you go:

Moab-0181.jpg

Winter Walk to Emerald Lake

Emerald Lake-01462.jpg

It seems like I never go to Rocky Mountain National Park in the summer (not to hike anyway, we’ve driven the Trail Ridge Road a couple of times). I suppose it makes sense; it’s less crowded in winter and in the summer I’m usually backpacking somewhere I don’t need permits or to plan months in advance.

Anyway - Emerald Lake. It’s one of the more popular hikes so even though there was a ton of snow we didn’t need snowshoes, just microspikes, since the snow was packed down. It was super windy at Emerald Lake (I suspect common) but the sunny skies made it feel much warmer. For a short, ~3 mi out and back hike, it was nice to get out into the mountains, even if it’s only for a few hours.

If you go:

Wild Basin Snowshoe

Wild Basin is a great place to hike. It’s close, it’s beautiful, and there are a plethora of trails. In fact it’s been almost exactly a year since last time we were here. Not feeling very motivated to pick a trail ahead of time we did a “let’s start hiking and see where we go” kind of day.

2018-Wild Basin Snowshoe-01322.jpg
2018-Wild Basin Snowshoe-01343.jpg

We started by walking down the road from the trailhead to the Finch Lake Cutoff trail. The first part of this trail only had a few inches of snow. As we went up the snow slowly got deeper. Then, just after 9,000ft, it all of a sudden increased another foot. Definitely time to strap on the snowshoes. Being the first hikers on the trail was magical and we took our time. Once we got to the intersection of the Finch Lake/Pear Lake and Allenspark trail the snow became packed down. We stopped here for lunch and a cup of tea and enjoyed the views towards the continental divide. After we followed the Finch Lake/Pear Lake trail to the Wild Basin trail and back out to the car.

If you go

Twin Sisters Peak

As winter closes in my range of hiking options shrink. Luckily the front range near Boulder stays snow free longer than the mountains farther west. In Rocky Mountain National Park the Twin Sisters Peak Trail is about 7 miles out and back and gets you to 11,427ft. It is straight up and straight back down. There are a few views along the way but it is mostly through the trees until the last half mile.

Twin Sisters Peak-01260.jpg

There was already snow on the trail and there were a couple dicey spots of ice (yep, I left my microspikes in the car…) on the way up but going slow it was doable. Once we got out of the trees the trail was clear. It was blue skies for miles and the views from the top were stunning.

Twin Sisters Peak-01268.jpg
Twin Sisters Peak-01264.jpg

Mt Bierstadt

My First 14er.

I’m not a peak bagger. I love getting a view but I’d much rather walk a ridgeline than summit something. However, it is rather embarrassing that I’ve lived in Colorado for over a year now and I haven’t hiked a 14er (aka a 14,000 ft mountain).

Mt Bierstadt seemed like a good place to start as it’s considered one of the easier 14ers. We got to the trailhead around 6am and it was already full. It was right around freezing and the boardwalks were slick with frost but once we got moving it was a beautiful clear day for hiking. Little patches of ice crunched under foot where the puddles were the day before.

2018-09-08 Mt Bierstadt-0566.jpg

The trail itself is well trodden and easy going, especially the first mile or so and we made good time. We hit the switchbacks as the sun started peeking over the ridge and then a short section of rock hopping and we were at the top. Snacks and views were consumed. The way down was a breeze. Lots of crowds were heading uphill, glad we got an early start.

2018-09-08 Mt Bierstadt-0612.jpg

The overall elevation gain is ~2,600, which isn’t that different from a lot of day hikes I do but getting up to 14,000ft certainly makes it more challenging. I recorded a trip time of just over 4 hours including a 20 min break at the top, 7.25 miles total.

If you go:

Guanella Pass TH

Trail Map: Caltopo / Gaia

Boulder Skyline Traverse

2018-05 Skyline-09976.jpg

The Skyline Traverse is an iconic Boulder hike/trail run. There are a number of routes you can take but the essence of the traverse is to summit the 5 highest peaks in the Flatirons. It’s a beast; depending on your route it’s at least 16 miles and 6,000ft of elevation gain.

Going south to north the peaks are South Boulder Peak, Bear Peak, Green Mountain, Flagstaff Mountain, and Mt Sanitas. Doing a car shuttle is an easy 15-20 minute drive. Another option is to take the RTD SKIP. The SKIP runs north and southbound along Broadway. It drops off at the Shanahan Ridge trailhead (our southern starting point) and is about a 10 minute walk from the Dakota Ridge trailhead (our northern ending point). Total bus journey & walking is about 35 minutes.

Since we live in the shadow of Mt Sanitas we opted for the RTD SKIP option. Stepping off the bus we were treated to a nice view of Bear Peak, the first and possibly hardest test of the day. To get to the top of Bear Peak there is almost 3,000ft of elevation gain, about half of the day’s total. We did Bear Peak last summer and it is a great hike on its lonesome if you don’t have the time or energy to do the whole traverse. After walking through the open space the trail ascends the rugged, steep and (thankfully) shaded Fern Valley trail for the first part of the climb. The trail then pops out of the forest onto the Bear Peak ridge for the last 1,000ft of the climb. Peak #1 down!

2018-05 Skyline-09999.jpg

To get to South Boulder Peak, the high point of the day at 8,549ft we scrambled down from Bear Peak and onto the short exposed trail that goes across the saddle between the two peaks. Then up and over some boulders to claim the summit. Peak #2 down!

Retracing our steps back past Bear Peak we headed down the Bear Peak West Ridge Trail. I really enjoyed this section of trail with great views of the continental divide to the west.

2018-05 Skyline-00010.jpg

We were so taken by the views we almost stepped on a huge snake! After the free shot of adrenaline we made good time down the ridge to the intersection with the forested Green Bear trail that heads up to the Green Mountain West Ridge trail and onto the summit of Green Mountain. Peak #3 down!

2018-05 Skyline-00036.jpg
2018-05 Skyline-00024.jpg

We took the Ranger trail from here which winds its way down hill and comes out at a parking area and the road leading up to Flagstaff Mountain. Two trails the circle the summit of Flagstaff Mountain, neither gets to the actual summit (they do get pretty close though). We took the Ute trail. The summit is covered in trees and there is no actual viewpoint and technically it’s not on the actual trail. We opted to stay on the trail to preserve the grasses since this is a high use area (LNT!). Peak #4 down-ish!

2018-05 Skyline-00046.jpg
2018-05 Skyline-09986.jpg

From here we took the Flagstaff trail down through the trees and saw glimpses of Boulder below. It’s a little confusing as there are a lot of trails but the signage is pretty good. The Panorama trail at approx mile 10.75 is the important one to take otherwise you’ll head all the way down to Chautauqua Park. From here we headed down to Eben G Fine park which has water, bathrooms and good shade along the creek. We stopped and soaked our feet in the creek and took a little power nap before heading on to Mt Sanitas.

2018-05 Skyline-00064.jpg
2018-05 Skyline-00083.jpg

The Red Rocks Trail leads past some big, you guessed it, red rocks and get you to the Sunshine Valley trailhead. The Mount Sanitas trail is deceptively steep and eroded, and the last part of the climb was tougher than we expected. Plus the 1250ft gain was the most we’d had since our initial climb of Bear Peak. After 1.25 miles the top was reached, peak #5 down!

From here we took the East Ridge and Sanitas Valley trail down and turned onto the Dakota Ridge Trail to get back to our neighborhood (and a round of well earned beers).

If you go:

Lily Mountain - Short Hike, Long Views

Blog 2018-04 Lily Mt-2232.jpg
Blog 2018-04 Lily Mt-2237.jpg

Lily Mountain is short but packs a punch. The trail itself is just under 2 miles each way with ~1,100ft of elevation gain, but the sweeping views from the top are some of the best, looking directly into Rocky Mountain National Park. It’s a great place to go for a short hike or, in my case, maximum reward for minimum effort for an out of state visitor.

Finding the trailhead can be a little bit of a challenge as it’s not really marked and there is no parking area. Use your GPS or just look for the cars parked off the side of the road near the start of the trail. The hike is mostly straightforward with a little bit of off-trail scrambling at the end to get to the official top. It’s a great place to hang out, eat some lunch or snacks and head back down to the parking area.

If you go:

Wild Basin, Wild Weather

It’s 60 and sunny in Boulder today but we’re trading that for 20s and a winter storm. Amazing how a short drive into the mountains changes things so fast.

We parked at the Wild Basin trailhead in Rocky Mountain National Park. It was sleeting when we hit the trail and we were glad for the forest cover for the first couple miles. We passed Ouzel Falls about halfway to the lake, but it wasn’t flowing very fast. After the falls the trail opens up, and we got glances of the divide as the storm clouds moved in and out.

Blog 2017-11-05 OuzelLake-09650.jpg
Blog 2017-11-05 OuzelLake-09639.jpg

At the trail junction the Ouzel Lake trail splits off and heads up an exposed ridge. This was one of the best parts of the hike, the weather was raw: wind and snow blowing in our faces as we hiked to the lake. About halfway between the start of the ridge and the lake the trail gets some shelter from the mountains again and the weather died down a bit. After a junction the trail dips down into the trees near Ouzel Creek before reaching the lake.

Blog 2017-11-05 OuzelLake-09644.jpg

Ouzel Lake was beautiful in the snow, the wind came and went as did the snow. We managed to find a sheltered spot and pulled out the stove to make some warming hot chocolate and enjoy watching the winter weather move in an out.  

If you go:

Blog 2017-11-05 OuzelLake-1233.jpg

Easy Does It - Sugarloaf Mt Hike

Blog 2017-10 Sugarloaf Mt-1133.jpg

Sometimes you have to forgo distance and difficulty in favor of all the snacks. The hike up Sugarloaf Mountain just outside of Boulder is a good one for that. It’s only 1.3 miles but offers great views in every direction with lots of spots at the top to enjoy all those snacks. This is also a great one for visitors who haven’t acclimated to the altitude yet.

Blog 2017-10 Sugarloaf Mt-1125.jpg
Blog 2017-10 Sugarloaf Mt-1147.jpg

If you go:

Indian Peaks Wilderness - Lost Lake

The Lost Lake trail is a nice way for us to dip our toes in the Indian Peaks Wilderness. It’s about 5 miles return and a decent (but not extreme) elevation gain, ~1,200ft, but it does start at 9,000ft.

It is extremely crowded at the Hessie trailhead, the difference here (I’m told) compared to others trailheads is there are very few parking spots. We opted to take the shuttle from the Nederland Park and Ride which runs every 15-20 minutes and drops off at the start of the trail. Worked like a charm. A great thing about the shuttle is that the RTD N route from Boulder drops off at the park and ride so it’s possible to get to the Indian Peaks Wilderness using public transport. I’d love to see more options for getting into the backcountry without needing a car.

Blog 2017-09-06 Lost Lake-09347.jpg

The hike starts by going back to the old Hessie homestead and into the forest briefly before opening up and heading uphill. Along the climb there are views back towards the front ranges. There is a trail junction, opt to go over the creek on the Devil’s Thumb trail towards Lost Lake. Shortly after turn onto the trail to Lost Lake and begin the steepest climb on the hike until you reach the lake.

Blog 2017-09-06 Lost Lake-09353.jpg

It is fairly brushy at the base of the lake but if you walk a bit farther around and past some campsites there are much easier spots to get to water. The views on the opposite side of the lake are much nicer, with the divide in the background. The trail continues uphill past the lake, we walked about another .5 mile to get a nice view from above. Anywhere around the lake makes a pleasant spot for lunch or to relax. Head back down the same way you came up to get back to the trailhead.

If you go: